

How To Make Delicious Kombucha Tea From Scratch
Are you looking for a delicious and healthy drink to enjoy? If so, then you should try kombucha tea!
Kombucha is made by fermenting tea. The fermentation process is started by adding a starter culture known as a SCOBY (Symbiotic Colony of Bacteria and Yeast). The SCOBY will eat the sugar in the tea, creating a probiotic-rich beverage.
In this blog post, we will teach you how to make kombucha tea at home using simple ingredients. We'll also provide tips on flavor combinations and bottling. So let's get started!

Filtered or spring water is the best choice for making kombucha. However, if your tap water tastes good when you drink it, you can use it to make this beverage.
You can use any cane or beet sugar in your kombucha tea, such as regular table sugar, turbinado, demerara, sugar-in-the-raw, or brown sugar.
Alternative sugars, such as agave and coconut sugar, are more difficult to work with and can cause fermentation problems. Avoid experimenting with them until you've brewed kombucha for a while.
Artificial sweeteners like stevia or Sweet-and-Low will not work in kombucha production.
You can make kombucha with any caffeinated tea: black tea, green tea, oolong tea, or white tea. Avoid herbal teas and those containing essential oils; these can interfere with fermentation and potentially lead to mold growth on the SCOBY.
You can obtain a SCOBY by growing one yourself or ordering one online from a company such as Kombucha Kamp. We recommend purchasing a "live" SCOBY in its liquid form. Live SCOBY is generally healthier and easier to start with than a dehydrated one.
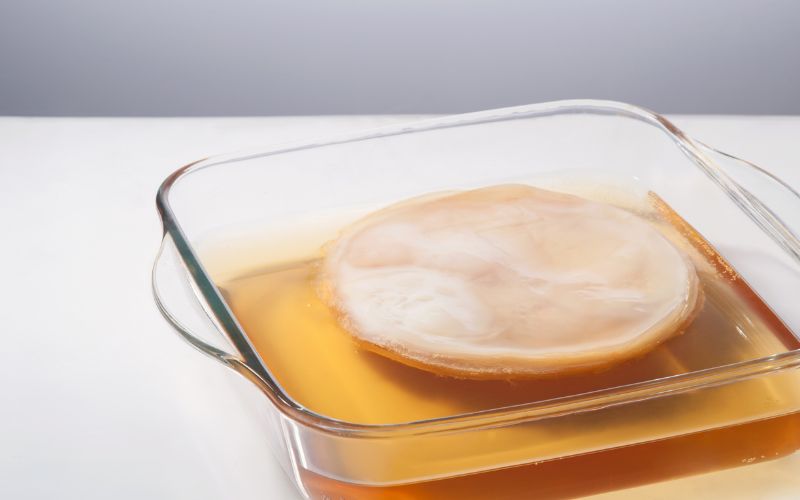
A SCOBY is a cellulose mat containing bacteria and yeast cultures that ferment sweet tea to make kombucha.
Each time you make kombucha, a new or "baby" SCOBY is formed and aids in the fermentation of sweet tea into more kombucha. It's essentially the mechanism by which kombucha reproduces itself.
It's similar to how sourdough bread bakers have a "mother" dough or sourdough "starter," which is a unique collection of yeasts that must be "fed" with flour and water and is used to make more sourdough loaves.
Getting a SCOBY is the first step in making your kombucha. Starter kits and cultures can be purchased online or at certain health food stores.
To reduce pesticide exposure and ensure product quality, look for an organic SCOBY from a reputable retailer. You can also borrow a SCOBY from a friend who makes homemade kombucha or join an online community to find someone in your area who has a SCOBY to spare.
Since the SCOBY grows with each batch of kombucha, it can be divided and shared by cutting off a 1-inch piece and passing it on.
The SCOBY does not like decaf tea and will not grow as well if fed.
Green or fruity teas do not support the growth of the SCOBY. You can use green tea once your SCOBY is bigger.
Honey can have botulism-causing bacteria, which can be dangerous when bacteria and yeast grow in kombucha in large numbers. Once the good bacteria are more numerous than the bad, you can use honey in the second fermentation, but for now, stick with sugar.
The first fermentation usually takes 7-12 days, though some prefer to go longer. During this time, the starter tea and a kombucha culture (SCOBY) ferment the sweet tea, transforming it into kombucha. After the first fermentation, you'll have unflavored, mostly carbonated kombucha tea.
Experiment with green, white, oolong, or combinations of these teas. Combine fruit teas with a few black tea bags to give the SCOBY the nutrients it requires to thrive.
Peel off a few layers of the SCOBY once it's about an inch thick to make a second SCOBY. You can use it to make another batch or give it to a friend.
When you've reached the end of primary fermentation, your kombucha is ready for the second fermentation. Here are some signs to look for:
Some people like to drink kombucha right after the first fermentation, which is fine. You don't have to add flavors or put the kombucha in bottles before drinking it. However, if you want to flavor your kombucha and give it more fizz, it must undergo a second fermentation process using airtight bottles.
In this process, you add flavors to your brew and put it in a sealed container to keep the carbonation in the liquid. Usually, it takes 2 to 4 days, but it can take longer.
It's similar to bottle conditioning in beer and champagne production. You add a small amount of priming sugar, then seal it up to allow the yeasts to consume the sugar and convert it to carbon dioxide. The majority of the sugar in kombucha comes from fruit.
The longer you leave the second fermentation in the bottle at room temperature, the more carbonation builds up in the kombucha. So, refrigerate the bottles for a couple of days to prevent your drink from getting too carbonated.

When you are ready to bottle your kombucha, it is important to select the right type of bottles and caps.
The best bottles for kombucha are thick, dark glass bottles with tight-fitting closures. Swing top bottles work well, as do screw top bottles with air-tight seals. Avoid using plastic or metal containers, as these can interact with the kombucha and affect its flavor.
When selecting caps, make sure they are tight-fitting and food-grade. You can find caps specifically designed for kombucha bottles at many home brewing supply stores. Alternatively, you can reuse screw-top bottle caps from store-bought beverages, as long as they fit snugly and have not been used for anything else.
Once you have your bottles and caps, it is time to start bottling your kombucha! Be sure to leave about an inch of headspace at the top of each bottle to allow for carbonation. If you are using swing top bottles, ensure the gaskets are in good condition, and the bottles are clean and dry before closing them. Screw top bottles should be sealed tightly with a bottle cap wrench.
Label your bottles with the date and contents, then store them in a cool, dark place until you are ready to drink them. Kombucha is best enjoyed cold, so refrigerate your bottles before opening.

Kombucha is a fermented tea that is naturally slightly acidic and carbonated. While many people enjoy the taste of plain kombucha, others find it to be an acquired taste. If you're in the latter camp, don't despair—it's easy to add flavor to kombucha without compromising its health benefits.
Cherry, blueberry, grape, cranberry, pomegranate, and mango are some popular kombucha flavors. Before adding the kombucha, add about 1/4 cup of fruit juice to each bottle. Use more or less of the juice, depending on your bottle size and how fruity you like your kombucha.
You can also use whole fruits to flavor your kombucha, which is useful if you want a flavor like strawberry or plum that isn't easily available as juice.
You can add chopped fruits directly to the bottles or transfer the kombucha to a new 1-gallon jar, cover, and steep for a few days before straining and bottling. It is normal for a new SCOBY to form on the surface of the liquid, which you can discard before drinking.
Fresh ginger, chopped or juiced, creates a spicy and tingly kombucha. You can add ginger on its own or with your favorite juice. Do not use powdered ginger because it does not dissolve and imparts a gritty flavor to the kombucha.
It's worth noting that adding fruit juice or chopped fruit to your kombucha ramps up the carbonation process. These sugars are like a fresh meal for the kombucha yeast! So, check your bottles more frequently than you would normally.
Kombucha equipment should be cleaned after each brewing cycle to prevent the build-up of bacteria and mold. But the thing about properly fermented kombucha is that its low, acidic pH makes it hard for harmful pathogens to live in it.
Kombucha tea is a delicious, healthy drink that is easy to make at home. With just a few simple ingredients and some time, you can be on your way to enjoying this probiotic beverage.
Making kombucha might seem time-consuming, but it is straightforward and rewarding. You will not just save money by making your own kombucha, but you can also avoid the harmful additives used in many commercial brands.
So what are you waiting for? Get brewing!


